Setting up a NetSuite Connection
The following steps must be used when adding a new NetSuite connector. SmartConnect connects using a NetSuite role, so data access is limited to that role’s permissions.
SmartConnect supports two authentication methods for NetSuite. Either one is optional, but at least one must be set up. The method you set up determines which NetSuite sources and destinations are available:
- Token-Based Authentication – SOAP sources and destinations only.
- OAuth 2.0 Client Credentials (M2M) – REST sources and destinations only.
- Both – All NetSuite sources and destinations.
See Step 8, Refreshing Metadata, for which features use SOAP and which use REST.
SuiteSignOn is no longer supported by NetSuite and is not an available authentication type in SmartConnect. Any existing SuiteSignOn connections will need to be changed to Token Based Authentication or OAuth 2.0 Client Credentials.
1. Retrieve NetSuite Account Id
- Log into NetSuite.
- Navigate to Setup > Company > Company Information.
- Find the Account Id field and save this value for later.

2. Enable Required Integration Features
- Log into NetSuite.
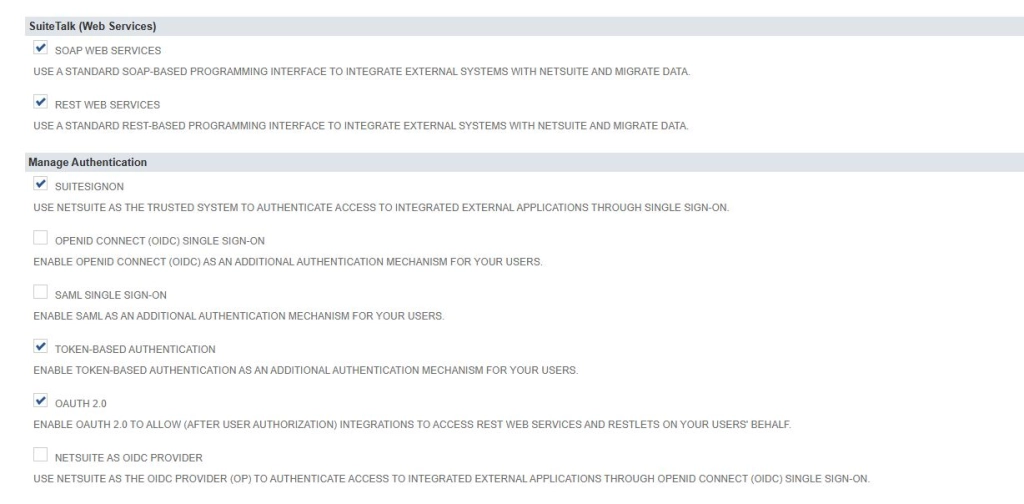
- Navigate to Setup > Company > Enable Features.
- Click the Suite Cloud tab.
- In the SuiteTalk (Web Services) section select the following.
- SOAP WEB SERVICES
- REST WEB SERVICES
- In the Manage Authentication section select the following.
- TOKEN-BASED AUTHENTICATION (required for Token-Based Authentication)
- OAUTH 2.0 (required for OAuth 2.0 Client Credentials)
- Click Save.
3. Create a NetSuite Integration record
Before adding a connector, we will need an integration record to link to our integration via a Consumer Key and Consumer Secret. It is recommended to create a unique integration record for each integration application used.
- Log into NetSuite.
- Navigate to Setup > Integrations > Manage Integrations > New.
- Enter a Name for the integration.
- If you are using Token-Based Authentication, check the box for TOKEN-BASED AUTHENTICATION.
- Enter in the Redirect URI found in SmartConnect under System > API Settings > Generic REST OAuth Redirect Url
- To use OAuth 2.0 Client Credentials, in the OAuth 2.0 section:
- Check CLIENT CREDENTIALS (MACHINE TO MACHINE) GRANT.
- Under Scope, check REST WEB SERVICES.
- Click Save.
The CONSUMER KEY and CONSUMER SECRET will only be displayed one time, so save them now. You will need both later in SmartConnect. When the Client Credentials grant is checked, the Consumer Key is also the Client ID used for OAuth 2.0.

4. Create an Access Token
Before we can create an access token, we need to setup a role and assign the role to a user. Both authentication methods require the role and user. The access token is only needed for Token-Based Authentication.
Create/Edit Role
- Log into NetSuite.
- Navigate to Setup > User/Roles > Manage Roles.
- Click the New Role button or Edit an existing role if you have one setup that you would like to add token-based authentication to.
- You can setup the role as needed, but the following Permissions are required for SmartConnect.
- Permissions > Reports
- SuiteAnalytics Workbook
- Permissions > Lists
- Employees
- Employee Record
- Permissions > Setup
- Custom Entity Fields
- Custom Fields
- Custom Record Types
- Log in using OAuth 2.0 Access Tokens (required for OAuth 2.0 Client Credentials)
- REST Web Services
- SOAP Web Services
- User Access Tokens
- Permissions > Reports
- Click Save.
These are the minimum permissions needed to be able to setup the connector. You will need additional permissions in place in order to query role categories/types depending on your specific needs.


It can take up to 24 hours for custom fields to show when adding new permissions to a role. So custom fields might not show right away. If you use a role that already had permissions setup, then custom fields should show right away.
Assign Role to User
- Navigate to List > Employees > Employees.
- Click Edit on desired user.
- Click on the Access tab, then the Roles sub tab.
- Assign the Role created/updated previously

Generate Access Token for User (Token-Based Authentication only)
- Navigating to Setup > Users/Roles > Access Tokens > New.
- Choose the APPLICATION NAME that was created in Step 3.
- Select the USER we assigned the role to, and choose the ROLE.
- Click Save.
The Token and Token Secret will only be shown once, so save them now. You will need both later in SmartConnect.

5. Setup a NetSuite connector in SmartConnect.com
- Log into SmartConnect.
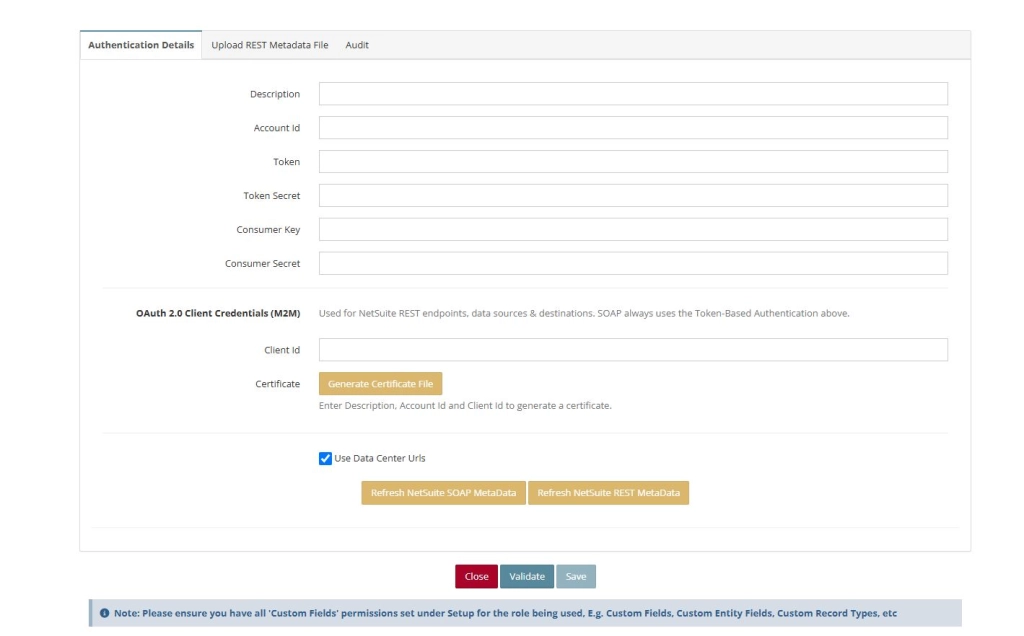
- Navigate to Connections > Create Connection > NetSuite.
- Provide a Description.
- Enter the Account Id from Step 1.
- For Token-Based Authentication:
- Enter the Token and Token Secret from Step 4.
- Enter the Consumer Key and Consumer Secret from Step 3.
- For OAuth 2.0 Client Credentials (M2M):
- Enter the Client Id. This is the Consumer Key / Client ID from Step 3.
- Click Generate Certificate File and save the file. The Description, Account Id, and Client Id must be entered before the certificate can be generated.
- Check the box for Use Data Center Urls.
Leave the fields blank for any method you are not using. The Token-Based Authentication fields enable SOAP sources and destinations, and the Client Id and certificate enable REST sources and destinations.
If you are using OAuth 2.0 Client Credentials, complete Step 6 before validating the connection. Otherwise, continue to Step 7.
6. Map the Certificate in NetSuite (OAuth 2.0 Client Credentials only)
NetSuite links the certificate generated in SmartConnect to a user, role, and integration record. This mapping is required for OAuth 2.0 Client Credentials to work.
- Log into NetSuite as an administrator, or as a user whose role has the OAuth 2.0 Authorized Applications Management permission.
- Navigate to Setup > Integration > Manage Authentication > OAuth 2.0 Client Credentials (M2M) Setup.
- Click Create New.
- Entity – Select the user the role was assigned to in Step 4.
- Role – Select the role created/updated in Step 4.
- Application – Select the integration record created in Step 3. The integration record is only available if CLIENT CREDENTIALS (MACHINE TO MACHINE) GRANT is checked.
- Certificate – Upload the certificate file generated in SmartConnect.
- Click Save.
Note – The mapping is not copied between NetSuite accounts. Create it separately in each production and sandbox account, and again after a sandbox refresh. If the certificate expires or is revoked, generate a new certificate in SmartConnect and create a new mapping.
7. Validate the Connection
- Return to the NetSuite connection in SmartConnect.
- Click Validate.
- Click Save.
This connector can now be used for sources and destinations in SmartConnect.com.
If the user access tokens are active, this connection will work, even if the user needs to change their password due to a password policy.
8. Refreshing Metadata
The NetSuite connector caches the metadata of your NetSuite environment. If you are not seeing a NetSuite record or field that you recently added or have recently edited the security role linked to the token, you will need to refresh the appropriate metadata.
Metadata is automatically loaded the first time the connector is saved. These features are only required if future changes are made in NetSuite.
- Open the NetSuite Connection.
- Click the Refresh button for the appropriate API.
- You can review the status of the metadata refresh on the Audit tab of the connector.
Refresh NetSuite SOAP MetaData
This metadata requires Token-Based Authentication and is used for the below functions:
- NetSuite Bulk Query Data Sources
- NetSuite Real-Time Data Sources
- NetSuite Destinations
- List Lookup
- Reference Lookup
- Multi Lookup
Refresh NetSuite REST MetaData
This metadata requires OAuth 2.0 Client Credentials and is used for the below functions:
- NetSuite SuiteQL Query Data Sources
- NetSuite RESTlet Data Sources
- NetSuite REST Destinations
- SuiteQL Lookup
